Author: Frederick R. Vobbe, W8HDU
April 30, 2012
| Audio Patch Bay 101 Author: Frederick R. Vobbe, W8HDU April 30, 2012 |
Audio patch bays are a wonderful tool, especially if you have ever been in the position of having to walk around the back of a console, re-plugging in connections, and then later having to figure out what cable is connected to what I/O.
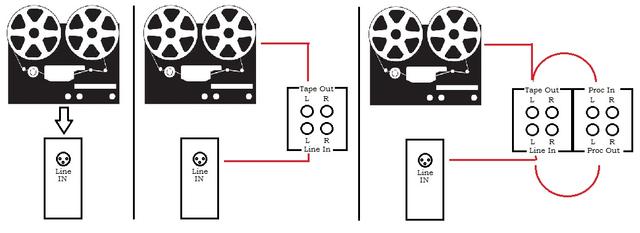
The patch bay allow me to configure a channel for a special need, then remove the connection. For example, in the left pane we see the output of a tape machine going to an input. If we run it through a "normalized" patch, (as shown in the center), and return the output to the input of the console, we could take the output of the tape machine and run it to the patch point of another device, (as seen on the right), and then back to the console input. When we are done we just pull the plugs and we're all back to normal.

Normalling creates a default circuit through the patch panel to connect equipment together in the arrangement you normally or most frequently use. When you plug in a patch cord, you break this "normal" circuit and create a temporary new circuit. Pro Patch lets you select from a variety of normalling options.
 |
Normals Strapped (fully normalled): In a fully normalled configuration, the normals of each jack in the top row are internally strapped to the normals of the jack below it with the tip (T), ring (R), and sleeve (S) contacts brought out to the rear panel terminations. At the rear panel, equipment is wired to the two jacks, creating a normal circuit. To break this normal connection, you insert a patch cord into either jack. |
 |
Half-Normalled: In a half normalled configuration, the normals of the bottom jack are internally wired to the tip (T) and ring (R) connections of the to jack, and the tip, ring, and sleeve of both jacks are brought out to the rear terminations, creating a normal circuit. Inserting a plug into the top jack monitors the circuit without breaking it, and inserting a plug into the bottom jack breaks the circuit. |
 |
No Normals: A panel without normals has jacks that are open (no normal connection) until patched. When the patch cord is inserted, the signal flows through the cord and jack to or from the equipment connected to the jack at the rear termination No normal patch panels require looping plugs (u-links) or patch cords to complete the circuit. |
 |
Normals Out: In this configuration normals are brought out to the rear terminations where you can strap them as you want them. Note that you cannot change the normalling on panels with internal normals because normalling is done at the jacks. Select the normals out option if you need the ability to change normals. |
 |
Sleeve Normals Out: Sleeve normals out are the same as normals out except that a sleeve normal is switched inside the jack in addition to tip and ring normals. The sleeve normal is also brought out and is typically used for a ground connection. Making it switchable allows grounds for different functions to be separated to prevent ground loops that produce audio hum. |
 |
Bussed Grounds: In a bussed grounds configuration the ground connections of all jacks are brought out to the rear terminations and connected together. This provides a common ground for all jacks. I can not emphasize the need for good ground design. Most of the signal problems in studios are due to poor grounding, ground loops, and lifted grounds which have gained a voltage potential of your master ground. Grounding is also important when in RF fields, be they broadcast, or where a wireless microphone, or two-way radio can cause interference to a signal. When grounding patch bays it's always important that ground be the same as all studio equipment. You should have a ground system where the console is the centerpoint, and all equipment, patch bays, and circuits "star" off the ground point. Doing it this way minimizes the exposure to hum pick up. Be careful not to loop, or use multiple grounds. When I have wired bussed ground, I usually use a solid wire, #18 to #14, with no insulation. Alpha p/n: 296 SV005, is a Single Conductor 18 AWG Buss bar wire, on a 100 foot spool. Because it's silver wire, it costs about $50. The cheapest place I've found it at is Mouser Electronics (p/n: 602-296-100). |
References
 |
© Copyright 2012 All Rights Reserved - W8HDU |